Create lean Node.js image with Docker multi-stage build
TL;DR
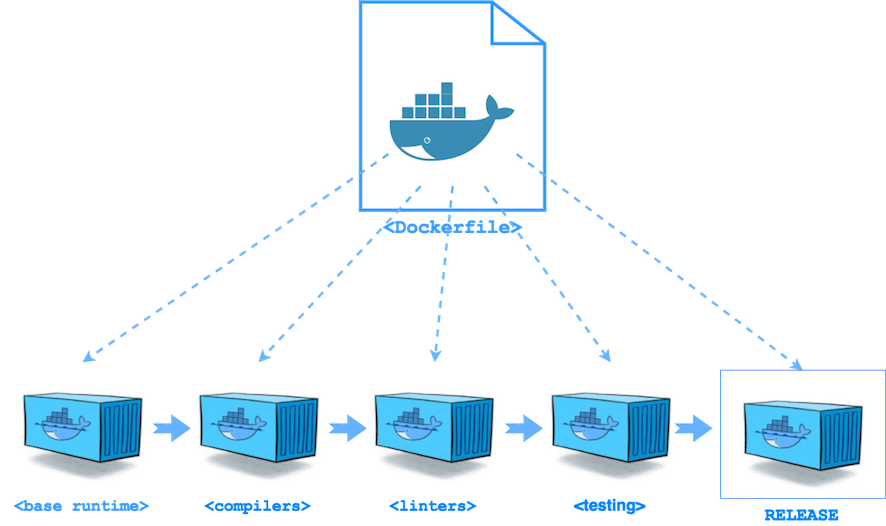
Starting from Docker 17.05+, you can create a single Dockerfile that can build multiple helper images with compilers, tools, and tests and use files from above images to produce the final Docker image.
The “core principle” of Dockerfile
Docker can build images by reading the instructions from a Dockerfile. A Dockerfile is a text file that contains a list of all the commands needed to build a new Docker image. The syntax of Dockerfile is pretty simple and the Docker team tries to keep it intact between Docker engine releases.
The core principle is very simple: 1 Dockerfile -> 1 Docker Image.
This principle works just fine for basic use cases, where you just need to demonstrate Docker capabilities or put some “static” content into a Docker image.
Once you advance with Docker and would like to create secure and lean Docker images, singe Dockerfile is not enough.
People who insist on following the above principle find themselves with slow Docker builds, huge Docker images (several GB size images), slow deployment time and lots of CVE violations embedded into these images.
The Docker Build Container pattern
Docker Pattern: The Build Container
The basic idea behind Build Container pattern is simple:
Create additional Docker images with required tools (compilers, linters, testing tools) and use these images to produce lean, secure and production ready Docker image.
=============
An example of the Build Container pattern for typical Node.js application:
- Derive
FROMa Node base image (for examplenode:6.10-alpine)nodeandnpminstalled (Dockerfile.build) - Add
package.json - Install all node modules from
dependencyanddevDependency - Copy application code
- Run compilers, code coverage, linters, code analysis and testing tools
- Create the production Docker image; derive
FROMsame or other Node base image - install node modules required for runtime (
npm install --only=production) - expose
PORTand define defaultCMD(command to run your application) - Push the production image to some Docker registry
This flow assumes that you are using two or more separate Dockerfiles and a shell script or flow tool to orchestrate all steps above.
Example
I use a fork of Let’s Chat node.js application.
Builder Docker image with eslint, mocha and gulp
FROM alpine:3.5
# install node
RUN apk add --no-cache nodejs
# set working directory
WORKDIR /root/chat
# copy project file
COPY package.json .
# install node packages
RUN npm set progress=false && \
    npm config set depth 0 && \
    npm install
# copy app files
COPY . .
# run linter, setup and tests
CMD npm run lint && npm run setup && npm run test
Production Docker image with ‘production’ node modules only
FROM alpine:3.5
# install node
RUN apk add --no-cache nodejs tini
# set working directory
WORKDIR /root/chat
# copy project file
COPY package.json .
# install node packages
RUN npm set progress=false && \
    npm config set depth 0 && \
    npm install --only=production && \
    npm cache clean
# copy app files
COPY . .
# Set tini as entrypoint
ENTRYPOINT ["/sbin/tini", "--"]
# application server port
EXPOSE 5000
# default run command
CMD npm run start
What is Docker multi-stage build?
Docker 17.0.5 extends Dockerfile syntax to support new multi-stage build, by extending two commands: FROM and COPY.
The multi-stage build allows using multiple FROM commands in the same Dockerfile. The last FROM command produces the final Docker image, all other images are intermediate images (no final Docker image is produced, but all layers are cached).
The FROM syntax also supports AS keyword. Use AS keyword to give the current image a logical name and reference to it later by this name.
To copy files from intermediate images use COPY --from=<image_AS_name|image_number>, where number starts from 0 (but better to use logical name through AS keyword).
Creating a multi-stage Dockerfile for Node.js application
The Dockerfile below makes the Build Container pattern obsolete, allowing to achieve the same result with the single file.
#
# ---- Base Node ----
FROM alpine:3.5 AS base
# install node
RUN apk add --no-cache nodejs-npm tini
# set working directory
WORKDIR /root/chat
# Set tini as entrypoint
ENTRYPOINT ["/sbin/tini", "--"]
# copy project file
COPY package.json .

#
# ---- Dependencies ----
FROM base AS dependencies
# install node packages
RUN npm set progress=false && npm config set depth 0
RUN npm install --only=production
# copy production node_modules aside
RUN cp -R node_modules prod_node_modules
# install ALL node_modules, including 'devDependencies'
RUN npm install

#
# ---- Test ----
# run linters, setup and tests
FROM dependencies AS test
COPY . .
RUN  npm run lint && npm run setup && npm run test

#
# ---- Release ----
FROM base AS release
# copy production node_modules
COPY --from=dependencies /root/chat/prod_node_modules ./node_modules
# copy app sources
COPY . .
# expose port and define CMD
EXPOSE 5000
CMD npm run start
The above Dockerfile creates 3 intermediate Docker images and single release Docker image (the final FROM).
- First image
FROM alpine:3.5 AS bas- is a base Node image with:node,npm,tini(init app) andpackage.json - Second image
FROM base AS dependencies- contains all node modules fromdependenciesanddevDependencieswith additional copy ofdependenciesrequired for final image only - Third image
FROM dependencies AS test- runs linters, setup and tests (withmocha); if this run command fail not final image is produced - The final image
FROM base AS release- is a base Node image with application code and all node modules fromdependencies
Try Docker multi-stage build today
In order to try Docker multi-stage build, you need to get Docker 17.0.5, which is going to be released in May and currently available on the beta channel.
So, you have two options:
- Use beta channel to get Docker 17.0.5
- Run dind container (docker-in-docker)
Running Docker-in-Docker 17.0.5 (beta)
Running Docker 17.0.5 (beta) in docker container (--privileged is required):
$ docker run -d --rm --privileged -p 23751:2375 --name dind docker:17.05.0-ce-dind --storage-driver overlay2
Try mult-stage build. Add --host=:23751 to every Docker command, or set DOCKER_HOST environment variable.
$ # using --host
$ docker --host=:23751 build -t local/chat:multi-stage .

$ # OR: setting DOCKER_HOST
$ export DOCKER_HOST=localhost:23751
$ docker build -t local/chat:multi-stage .
Summary
With Docker multi-stage build feature, it’s possible to implement an advanced Docker image build pipeline using a single Dockerfile. Kudos to Docker team!
Hope, you find this post useful. I look forward to your comments and any questions you have.