Continuous Delivery and Continuous Deployment for Kubernetes microservices
Continuous Delivery and Continuous Deployment for Kubernetes microservices
THIS IS A DRAFT VERSION OF POST TO COME, PLEASE DO NOT SHARE
Starting Point
Over last years we’ve been adopting several concepts for our project, straggling to make them work together.
The first one is the Microservice Architecture. We did not start it clean and by the book, rather applied it to the already existing project: splitting big services into smaller and breaking excessive coupling. The refactoring work is not finished yet. New services, we are building, starts looking more like “microservices”, while there are still few that, I would call “micro-monoliths”. I have a feeling that this is a typical situation for an already existing project, that tries to adopt this new architecture pattern: you are almost there, but there is always a work to be done.
Another concept is using Docker for building, packaging and deploying application services. We bet on Docker from the very beginning and used it for most of our services and it happens to be a good bet. There are still few pure cloud services, that we are using when running our application on public cloud, thing like Databases, Error Analytics, Push Notifications and some others.
And one of the latest bet we made was Kubernetes. Kubernetes became the main runtime platform for our application. Adopting Kubernetes, allowed us not only to hide away lots of operational complexity, achieving better availability and scalability, but also be able to run our application on any public cloud and on-premise deployment.
With great flexibility, that Kubernetes provides, it brings an additional deployment complexity. Suddenly your services are not just plain Docker containers, but there are a lot of new (and useful) Kubernetes resources that you need to take care for: ConfigMsaps, Secrets, Services, Deployments, StatefulSets, PVs, PVCs, Ingress, Jobs and others. And it’s not always obvious where to keep all these resources and how they are related to Docker images built by CI tool.
“Continuous Delivery” vs. “Continuous Deployment”
The ambiguity of CD term annoys me a lot. Different people mean different things when using this term. And it’s not only about abbreviation meaning: Continuous Deployment vs Continuous Delivery, but also what do people really mean, when using this abbreviation.
Still, it looks like there is a common agreement that Continuous Deployment (CD) is a super-set of Continuous Delivery (CD). And the main difference, so far, is that Continuous Deployment is 100% automated, while in Continuous Delivery there are still some steps that should be done manually.
In our project, for example, we succeeded to achieve Continuous Delivery, that serves us well both for SaaS and on-premise versions of our product. Our next goal is to create fluent Continuous Deployment for SaaS version. We would like to be able release a change automatically to production, without human intervention, and be able to rollback to the previous version if something went wrong.
Kubernetes Application and Release Content
Now let’s talk about Release and try to define what is a Release Content?.
When we are releasing a change to some runtime environment (development, staging or production), it’s not always a code change, that is represented by a newly backed Docker image with some tag. Change can be done to application configurations, secrets, ingress rules, jobs we are running, volumes and other resources. It would be nice to be able to release all these changes in the same way as we release a code change. Actually, a change can be a mixture of both and in practice, it’s not a rare use case.
So, we need to find a good methodology and supporting technology, that will allow us to release a new version of our Kubernetes application, that might be composed of multiple changes and these changes are not only new Docker image tags. This methodology should allow us to do it repeatedly on any runtime environment (Kubernetes cluster in our case) and be able to rollback ALL changes to the previous version if something went wrong.
That’s why we adopted Helm as our main release management tool for Kubernetes.
Helm recap
This post is not about Helm, so Helm recap will be very short. I encourage you to read Helm documentation, it’s complete and well written.
Just to remind - core Helm concepts are:
- (Helm) Chart - is a package (
tararchive) with KubernetesYAMLtemplates (for different Kubernetes resources) and default values (also stored inYAMLfiles). Helm uses chart to install a new or update an existing (Helm) release. - (Helm) Release - is a Kubernetes application instance, installed with Helm. It is possible to create multiple releases from the same chart version.
- (Release) Revision - when updating an existing release, a new revision is created. Helm can rollback a release to the previous revision. Helm stores all revisions in ConfigMap and it’s possible to list previous releases with
helm historycommand. - Chart Repository - is a location where packaged charts can be stored and shared. Any web server that can store and serve static files can be used as Chart Repository (Nginx, GitHub, AWS S3 and others).
Helm consists of the server, called Tiller and the command line client, called helm. When releasing a new version (or updating an existing) helm client sends chart (template files and values) to the Helm server. Tiller server generates valid Kubernetes yaml files from templates and values and deploys them to Kubernetes, using Kubernetes API. Tiller also saves generated yaml files as a new revision inside ConfigMaps and can use previously saved revision for rollback operation.
It was a short recap. Helm is a flexible release management system and can be extended with plugins and hooks.
Helm Chart Management
Typical Helm chart contains a list of template files (yaml files with go templates commands) and values files (with configurations and secrets).
We use Git to store all our Helm chart files and Amazon S3 for chart repository.
Short How-To guide:
- Adopt some Git management methodology. We use something very close to the GitHub Flow model

- Have a
gitrepository for each microservice. Our typical project structure:# chart files chart/ # chart templates templates/ # external dependency requirements.yaml # default values values.yaml # chart definition Chart.yaml # source code scr/ # test code test/ # build scripts hack/ # multi-stage Docker build file Dockerfile # Codefresh CI/CD pipeline codefresh.yaml - We keep our application chart in a separate
gitrepository. The application chart does not contain templates, but only list of third party charts it needs (requirements.yamlfile) and values files for different runtime environments (testing,stagingandproduction) - All secrets in values files are encrypted with sops tool and we defined a
.gitignorefile and setup agit pre-commit hookto avoid unintentional commit of decrypted secrets.
Docker Continuous Integration
Building and testing code on git push/tag event and packaging it into some build artifact is a common knowledge and there are tons of tools, services, and tutorials how to do it.
Codefresh is one of such services, which is tuned effectively build Docker images.
Codefresh Docker CI has one significant benefit versus other similar services - besides just being fast CI for Docker, it maintains a traceability links between git commits, builds, Docker images and Helm Releases running on Kubernetes clusters.
Typical Docker CI flow
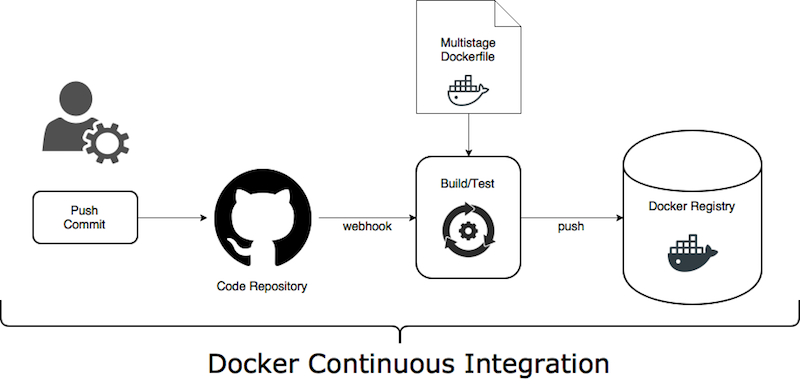
- Trigger CI pipeline on
pushevent - Build and test service code. Tip: give a try to a Docker multi-stage build.
- Tip: Embed the
git commitdetails into the Docker image (using Docker labels). I suggest following Label Schema convention. - Tag Docker image with
{branch}-{short SHA} - Push newly created Docker image into preferred Docker Registry
Docker multistage build
With a Docker multi-stage build, you can even remove a need to learn a custom CI DSL syntax, like Jenkins Job/Pipeline, or other YAML based DSL. Just use a familiar Dockerfile imperative syntax to describe all required CI stages (build, lint, test, package) and create a thin and secure final Docker image, that contains only bare minimum, required to run the service.
Using multi-stage Docker build, has other benefits.
It allows you to use the same CI flow both on the developer machine and the CI server. It can help you to switch easily between different CI services, using the same Dockerfile. The only thing you need is a right Docker daemon version (’> 17.05’). So, select CI service that supports latest Docker daemon versions.
Example: Node.js multi-stage Dockerfile
#
# ---- Base Node ----
FROM alpine:3.5 AS base
# install node
RUN apk add --no-cache nodejs-npm tini
# set working directory
WORKDIR /root/chat
# Set tini as entrypoint
ENTRYPOINT ["/sbin/tini", "--"]
# copy project file
COPY package.json .

#
# ---- Dependencies ----
FROM base AS dependencies
# install node packages
RUN npm set progress=false && npm config set depth 0
RUN npm install --only=production
# copy production node_modules aside
RUN cp -R node_modules prod_node_modules
# install ALL node_modules, including 'devDependencies'
RUN npm install

#
# ---- Test ----
# run linters, setup and tests
FROM dependencies AS test
COPY . .
RUN  npm run lint && npm run setup && npm run test

#
# ---- Release ----
FROM base AS release
# copy production node_modules
COPY --from=dependencies /root/chat/prod_node_modules ./node_modules
# copy app sources
COPY . .
# expose port and define CMD
EXPOSE 5000
CMD npm run start
Kubernetes Continuous Delivery (CD)
Building Docker image on git push is a very first step you need to automate, but …
Docker Continuous Integration is not a Kubernetes Continuous Deployment/Delivery
After CI completes, you just have a new build artifact - a Docker image file.
Now, somehow you need to deploy it to a desired environment (Kubernetes cluster) and maybe also need to modify other Kubernetes resources, like configurations, secrets, volumes, policies, and others. Or maybe you do not have a “pure” microservice architecture and some of your services still have some kind of inter-dependency and have to be released together. I know, this is not “by the book”, but this is a very common use case: people are not perfect and not all architectures out there perfect too. Usually, you start from an already existing project and try to move it to a new ideal architecture step by step.
So, on one side, you have one or more freshly backed Docker images. On the other side, there are one or more environments where you want to deploy these images with related configuration changes. And most likely, you would like to reduce required manual effort to the bare minimum or dismiss it completely, if possible.
Continuous Delivery is the next step we are taking. Most of the CD tasks should be automated, while there still may be a few tasks that should be done manually. The reason for having manual tasks can be different: either you cannot achieve full automation or you want to have a feeling of control (deciding when to release by pressing some “Release” button), or there is some manual effort required (bring the new server and switch in on :) )
For our Kubernetes Continuous Delivery pipeline, we manually update Codefresh application Helm chart with appropriate image tags and sometimes we also update different Kubernetes YAML template files too (defining a new PVC or environment variable). Once changes to our application chart are pushed into the git repository, an automated Continuous Delivery pipeline execution is triggered.
Codefresh includes some helper steps that make building Kubernetes CD pipeline easier. First, we have a built-in helm update step that can install or update a Helm chart on specified Kubernetes cluster or namespace, using Kubernetes context, defined in Codefresh account.
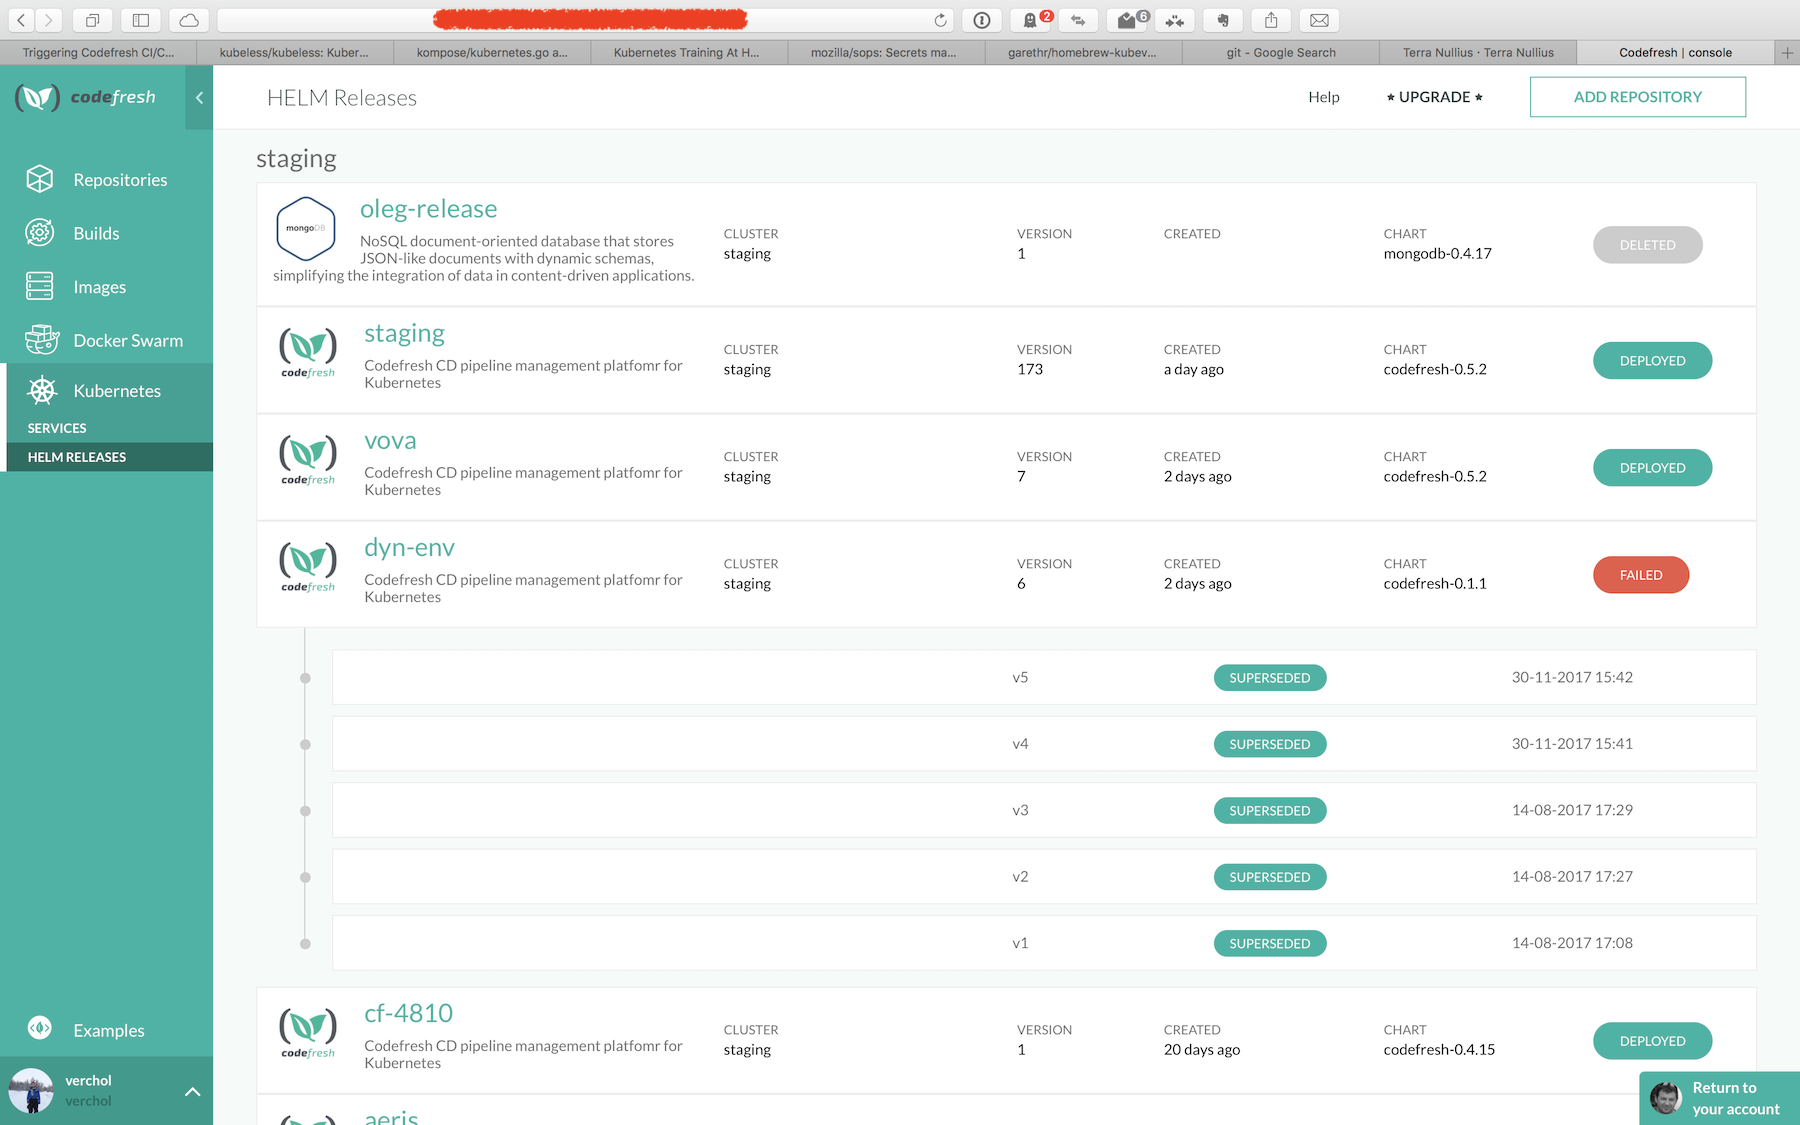
Codefresh also provides a nice view of what is running in your Kubernetes cluster, where it comes from (release, build) and what does it contain: images, image metadata (quality, security, etc.), code commits.
We use our own service (Codefresh) to build an effective Kubernetes Continuous Delivery pipeline for deploying Codefresh itself. We also constantly add new features and useful functionality that simplify our life (as developers) and hopefully help our customers too.
Typical Kubernetes Continuous Delivery flow
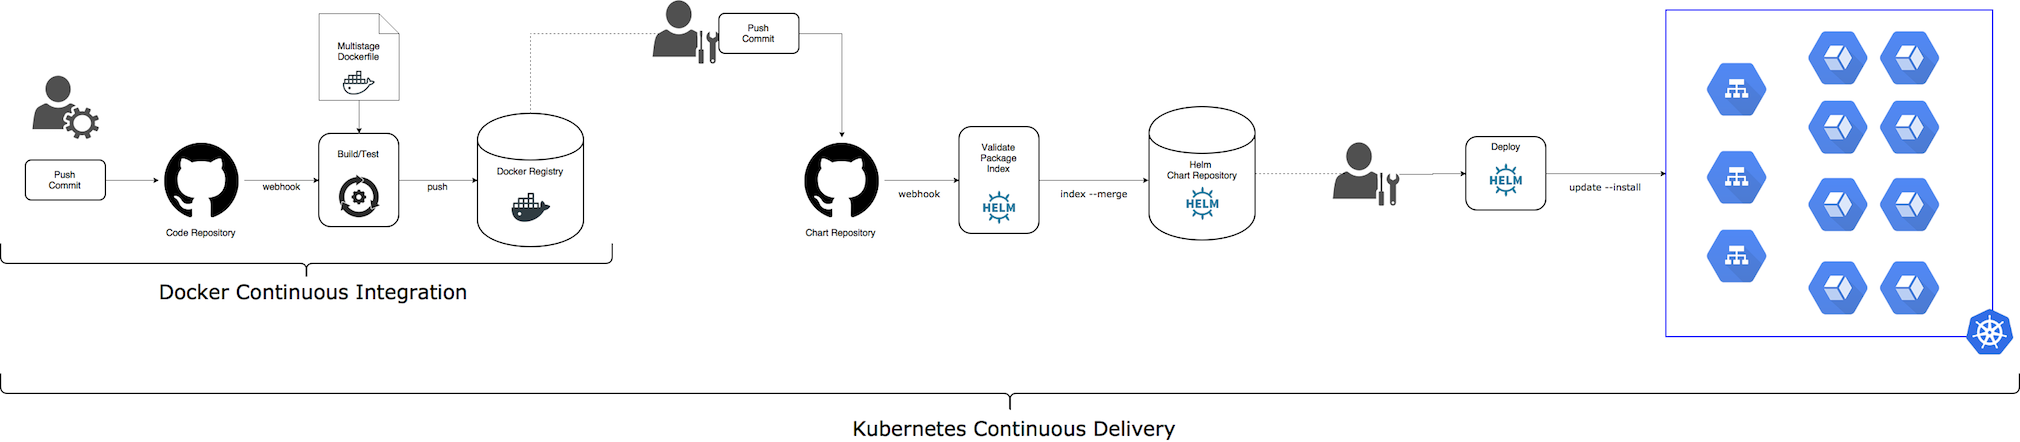
- Setup a Docker CI for the application microservices
- Update microservice/s code and chart template files, if needed (adding ports, env variables, volumes, etc.)
- Wait till Docker CI completes and you have a new Docker image for updated microservice/s
- Manage the application Helm chart code in separate
gitrepository; use the same git branch methodology as for microservices - Manually update
imageTags for updated microservice/s - Manually update the application Helm chart version
- Trigger CD pipeline on
git pushevent for the application Helm chart git repository- validate Helm chart syntax: use
helm lint - convert Helm chart to Kubernetes template files (with
helm templateplugin) and usekubevalto validate these files - package the application Helm
chartand push it to the Helm chart repository- Tip: create few chart repositories; I suggest having a chart repository per environment:
production,staging,develop
- Tip: create few chart repositories; I suggest having a chart repository per environment:
- validate Helm chart syntax: use
- Manually (or automatically) execute
helm upgrade --installfrom corresponding chart repository
After CD completes, we have a new artifact - an updated Helm chart package (tar archive) of our Kubernetes application with a new version number.
Now, we can run help upgrade --install command creating a new revision for the application release. If something goes wrong, we can always rollback failed release to the previous revision. For the sake of safety, I suggest first to run helm diff (using helm diff plugin) or at least use a --dry-run flag for the first run, inspect the difference between a new release version and already installed revision. If you are ok with upcoming changes, accept them and run the helm upgrade --install command without --dry-run flag.
Kubernetes Continuous Deployment (CD)
Based on above definition, to achieve Continuous Deployment we should try to avoid all manual steps, besides git push for code and configuration changes. All actions, running after git push, should be 100% automated and deliver all changes to a corresponding runtime environment.
Let’s take a look at manual steps from “Continuous Delivery” pipeline and think about how can we automate them?
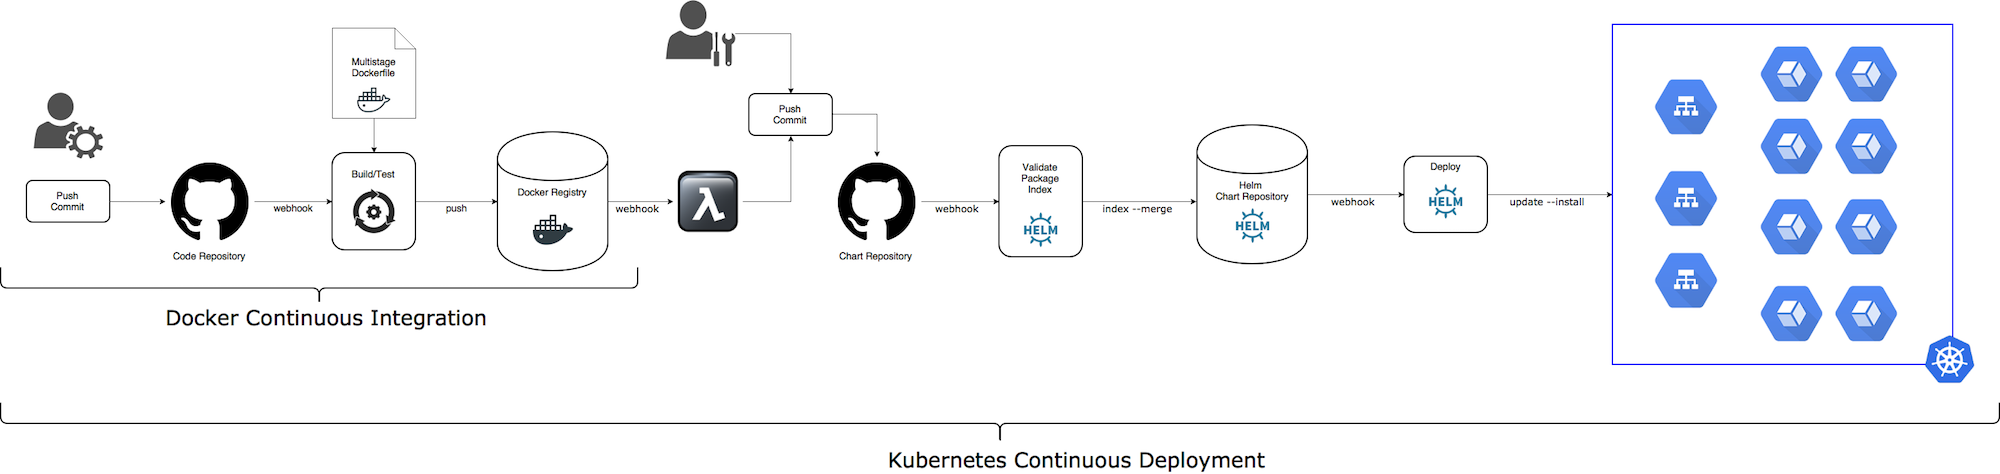
Automate: Update microservice imageTag after successful docker push
After a new Docker image for some microservice pushed to a Docker Registry, we would like to update the microservice Helm chart with the new Docker image tag. There are two (at least) options to do this.
- Add a Docker Registry WebHook handler (for example, using AWS Lambda). Take the new image tag from the DockerHub
pushevent payload and update correspondingimageTagin the Application Helm chart. For GitHub, we can use GitHub API to update a single file or bash scripting with mixture ofsedandgitcommands. - Add an additional step to every microservice CI pipeline, after
docker pushstep, to update a correspondingimageTagfor the microservice Helm chart
Automate: Deploy Application Helm chart
After a new chart version uploaded to a chart repository, we would like to deploy it automatically to “linked” runtime environment and rollback on failure.
Helm chart repository is not a real server that aware of deployed charts. It is possible to use any Web server that can serve static files as a Helm chart repository. In general, I like simplicity, but sometimes it leads to naive design and lack of basic functionality. With Helm chart repository it is the case. Therefore, I recommend using a web server that supports nice API and allows to get notifications about content change without pull loop. Amazon S3 can be a good choice for Helm chart repository
Once you have a chart repository up and running and can get notifications about a content update (as WebHook or with pool loop), and make next steps towards Kubernetes Continuous Deployment.
- Get updates from Helm chart repository: new chart version
- Run
helm update --installcommand to update/install a new application version on “linked” runtime environment - Run post-install and in-cluster integration tests
- Rollback to the previous application revision on any “failure”
Summary
This post describes our current Kubernetes Continuous Delivery" pipeline we succeeded to setup. There are still things we need to improve and change in order to achieve fully automated Continuous Deployment.
We constantly change Codefresh to be the product that helps us and our customers to build and maintain effective Kubernetes CD pipelines. Give it a try and let us know how can we improve it.
Hope, you find this post useful. I look forward to your comments and any questions you have.
This is a working draft version. The final post version is published at Codefresh Blog on December 4, 2018.